Batteries are a very important part of every automobile. Few people know how to properly maintain their vehicles battery, which can save you a lot of money from battery services in the future. This article will tell you how to execute a simple 10-minute battery check-up, so you are aware of how your battery is performing. This article will also walk you through how to replace your vehicle’s battery if it is not in good condition, so you are less likely to be stranded with a car that will not start.
Caring for your car battery
The last thing anyone wants to be concerned about is if your vehicle will not start due to your battery being dead. You can avoid many expenses that come along with battery failure and avoid the worrisome feeling of being stuck because your car will not start, by carrying out a 10-minute check-up along with a few maintenance tips.
To perform this check-up, you will need a set of wrenches, a post cleaner or side terminal, a hydrometer, and a cable puller. These supplies should be easily found in any of your local automobile shops.
Step 1: Clean the cables
Clean corrosion from the battery
Unfortunately, batteries have a tendency for corrosion to build up. To properly maintain your battery, you should regularly clean corrosion off. To properly clean the corrosion from your battery you should begin by using a tablespoon of baking soda, a cup of water and a nonmetallic brush. You should start cleaning the corrosion from the top of the battery, moving down to the cords. Once you have thoroughly cleaned the corrosion off, flush with cool water. After rinsing your corrosion and cleaning solution from the surface, you should disconnect the cables. To do this, you should begin by disconnecting the negative one. After that, you need to loosen the clamp bolts and twist them gently. If they are extremely stuck, we recommend using a cable puller. Once the cables are complete removed, use a post cleaner to clean the corrosion around the terminals and cables.
Step 2: Check the level of the electrolyte
Add water to fill holes, if necessary
Many people do not realize this, but car batteries need water. If your vehicle’s battery needs water, we recommend you use clean, distilled water. It is also very important that when you are adding water, you do not over fill the cells.
To properly add water to your automobile’s battery, first, gently take off the battery cell’s covers. Your battery should already have a water and acid mixture, which should be about 1/2 in. deep. If you see that your battery needs water, use clean water, do not overfill the cells, and check the case for cracks. If you discover that your battery has a crack, it is vital that you replace the battery as soon as possible.
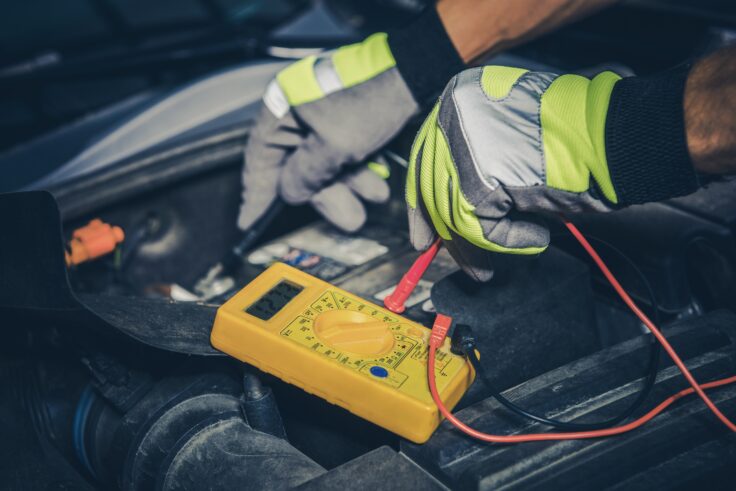
Step 3: Check the condition and charge of the battery
Test the electrolyte in each cell with a hydrometer
Test the water and acid solution (electrolyte) in each cell. To properly test this, you need a hydrometer. The first step is to squeeze the ball to gather the water and acid solution into the tester. Once you have collected the solution, hold the tester level and log the reading. After you have properly recorded the reading, squirt the solution back into the proper cell. Most testers are calibrated to read the average battery at 80 degrees F. Look up a guide to properly reading your batteries electrolytes and conclude whether or not your battery needs to be charged.
Step 4: To drop in the new battery first remove the cables
Disconnecting negative cable first
If your battery needs to be replaced, you should begin by disconnect the negative cable first. Once you have disconnected the negative cable then you should proceed by disconnecting the positive cable.
Remove the hold-down clamp from your vehicles battery. Disconnect the proper cables.
CAUTION!
Also remember to be extremely cautious while working with an automobile’s battery. We recommend that you always wear eye protection and rubber gloves, and that you never smoke, or have any flame around them!
Step 5: Replace the battery
Lifting out old battery
Before you attempt to lift the battery out, we recommend you tie a heavy-duty strap to the sides of the battery and then lift it out gently. Again, be extremely cautious; battery acid is very dangerous. It is also important to note that once you have removed the battery, not to drop it. Once the battery is out and properly placed somewhere safely on the ground, we recommend that you clean the battery tray. If the battery tray is badly corroded, then it would be in your best interest to replace it entirely. We recommend this because the weight of a battery needs to be properly supported.
Step 6: Reinstall the clamp and cables
Connecting hold-down clamp
Cautiously and carefully lift and place the new battery into the tray. Reconnect the hold-down clamp, and then the cables. Instead of reconnecting the negative first, start by reconnecting the positive and then the negative. To avoid corrosion and properly maintain your battery we recommend that you smear a little petroleum jelly onto the terminal before you properly fasten the cable clamps to the posts.
Agape Auto Service prides ourselves on having the most qualified technicians to work on your vehicle while also using the top quality equipment and products. Agape Auto Services uses BG Products to protect you, your family, and your vehicle. If you’re experiencing any issues with your battery or would just like a routine inspection of your vehicle to prevent any issues, give us a call today or click here to make an appointment.